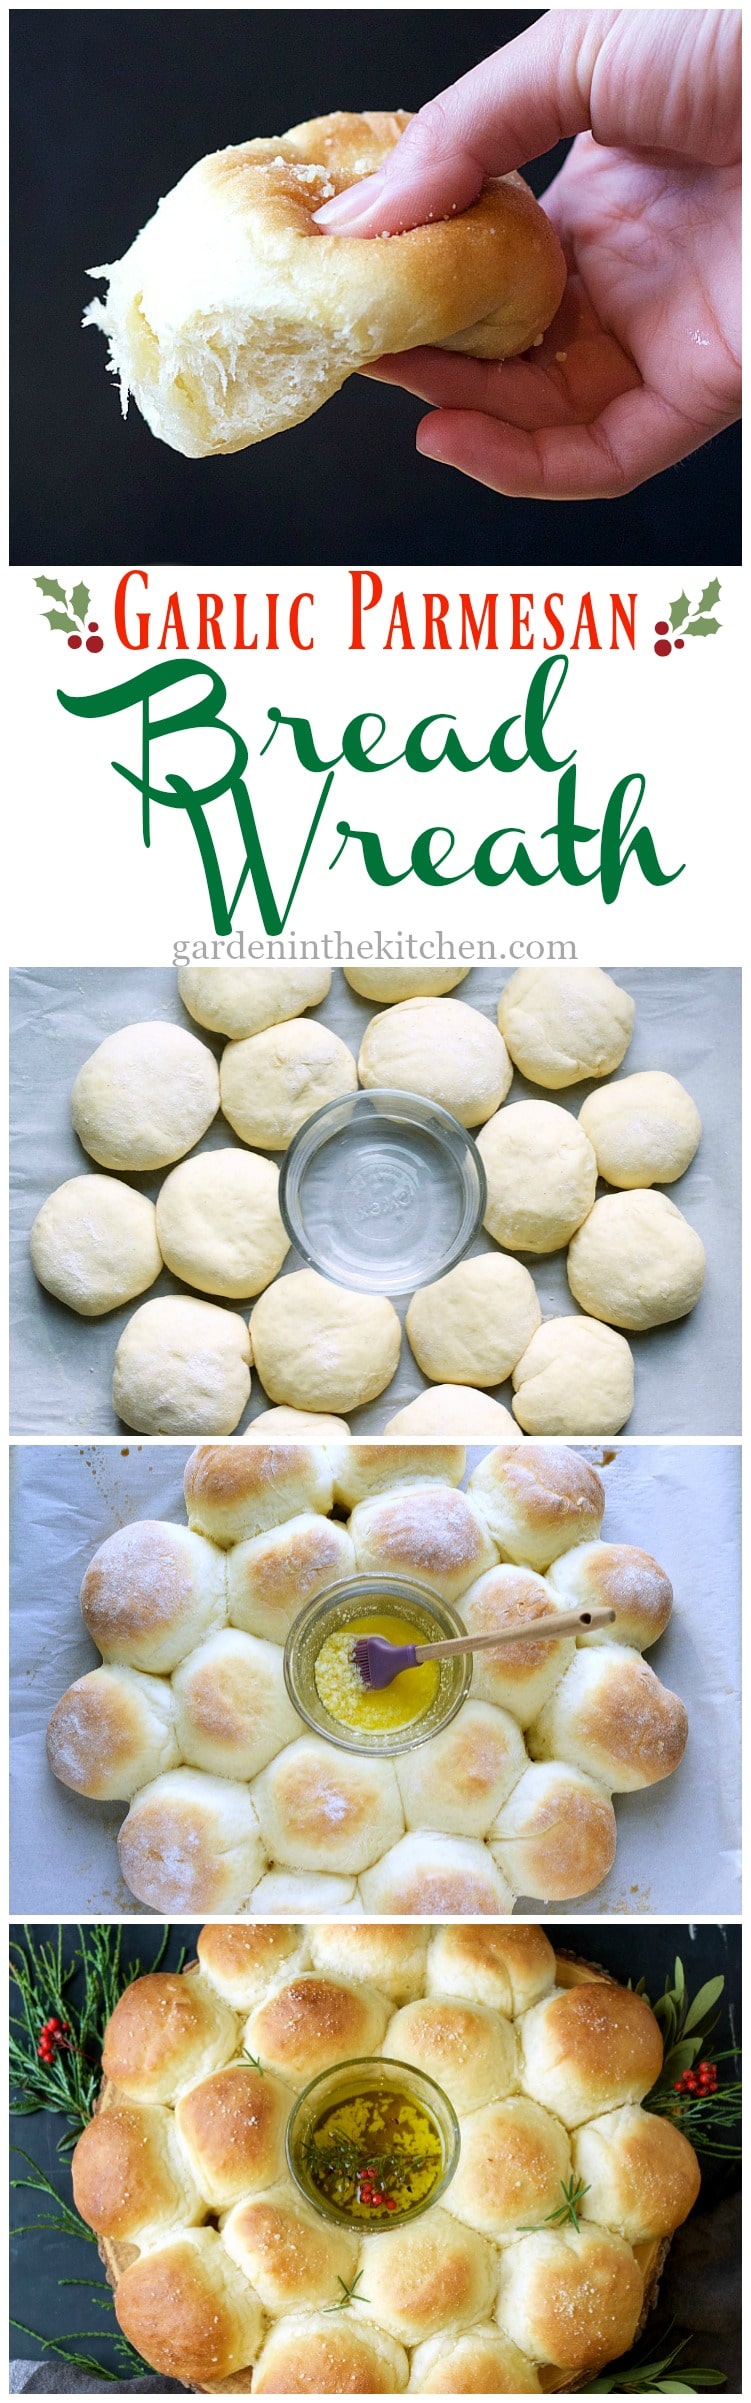
The softest dinner rolls arranged in cheerful bread wreath, topped with butter parmesan and served with a fragrant garlic parmesan rosemary oil!

Only two weeks away, the holiday countdown has officially begun. Time to plan, prepare and invest a little time on your holiday menu. Although I realize that not everyone fall into the planning ahead category (this was me for many years), I urge you to consider spending anywhere from a few hours or dedicate a day to plan, shop and get organized, so you can actually sit back and relax during the holidays.
Easier said then done, right?
I am with you! But…
Just like everything else, there is no right and wrong formula, so do what you can in a way that fits you best. For me planning ahead looks like this ->>AWESOME BREAD WREATH<<- trying and tasting things out so I know what works and what doesn’t. I don’t go overboard, most recipes I make are the classic ones I stick to and definitely taste out the new ones just to be safe.
Being a bread-addict that I am, when I first laid eyes on these soft dinner rolls recipe made by Nagi from RecipeTin Eats, I knew I had to try it! I’ve taken a few bread classes, to understand how the yeast and gluten interact with each other, why the measurements are so precise and ultimately to make bread work for me, but NEVER had I tried a recipe that worked this good!! Plus, if you head over to Nagi’s recipe, she has a video showing you exactly how to make these soft rolls.
In the past I made pretzels, garlic knots, French bread, ciabatta, lot’s of focaccia and most recently croissants, but I feel like it’s going to be a while experimenting with these soft rolls, without messing with the original formula off course!
Since the holidays are just around the corner, I thought it would be amazing to add a touch of flavor and holiday cheer to these delicious soft rolls, and arrange them into a beautiful wreath, living just enough room in the center for a fragrant dipping oil, because on holidays we dip!
The result was a breathtaking bread arrangement that will be perfect for the holidays! It will look amazing on the table and taste incredible. Furthermore, if you are feeling generous enough, this bread wreath will be an incredible gift to offer to someone special.
Lastly, if you are invited to a dinner party and are looking for an eye catching dish to bring… oh hellooooo I think you just found the PERFECT one!!

Garlic Parmesan Bread Wreath
Ingredients
- 4 1/2 cups bread flour
- 1 tbsp instant yeast
- 1/2 cup warm water comfortable to touch
- 1/4 cup white sugar
- 1 cup milk room temperature
- 4 tbsp unsalted butter melted at room temperature
- 2 eggs beaten and at room temperature
- 1 tsp sea salt
Brushing + Dipping
- 1 tbsp unsalted butter
- 2 tbsp olive oil
- 1 garlic clove pressed or minced
- 2 tbsp parmesan cheese divided
- 1/4 tsp red pepper flakes
- fresh rosemary garnish
Instructions
- The first step is to wake up the yeast. To accelerate this process we use warm water and give the yeast something to feed, sugar. So grab a small bowl and add in 1/2 cup warm water, the yeast and 2 tbsp of sugar. Give it a little mix and set aside while we work on the other ingredients. By the time we need the yeast mixture, it should have a foamy layer on top. This is good!
- Next heat the milk in the microwave until it is comfortably warm. Set aside
- Melt the butter in microwave and set aside to return to room temperature.
- Beat the eggs with a fork. Set aside
- Now we work with our dry ingredients. Let’s grab a large bowl (this is the bowl you will mix and let the dough rise, so be sure to use one that is large enough!). Add in the flour, remaining sugar and tsp of sea salt and mix to combine.
- Now it’s time to bring all the ingredients together. To make it easier, push the flour to the sides of the bowl creating a pocket in the middle. Add in the milk, butter, eggs and yeast, mix using a wooden spoon. Mix, mix and mix until combined. It’s going to be thick and sticky, that’s okay! I usually do not spend more then 5-7 minutes working on the dough.
- Cover the bowl with a moist towel and let it rise until at least twice the size, or about 2-2 1/2 hours.
- When dough has risen, remove the towel and give the dough a punch to deflate. Then remove the dough from the bowl, onto a floured surface. Not overly floured, just enough so the dough doesn’t stick to the surface. Using your hands form the dough into a log.
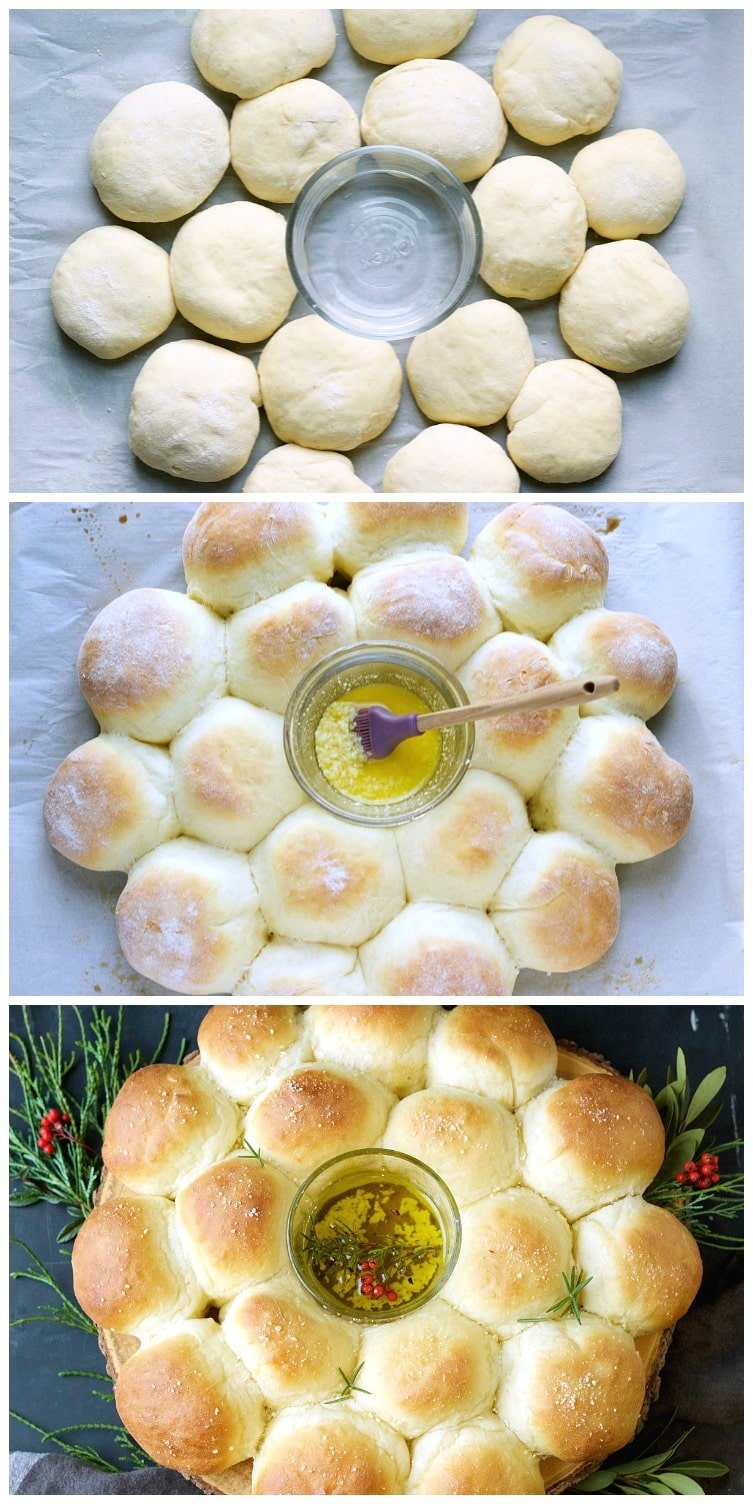
- Using a large sharp knife cut the dough in half (short side) and then each half into 3 smaller logs. You will end up with 6 smaller logs. Then you cut each of the logs into 3 equal size parts, totaling 18 dough pieces.
- To make perfectly round and soft rolls, take one dough piece and flatten with your hand. Then pull each of the sides into the center, pinching the pieces together. Turn the flattened side up, tuck in the bottom as you round the edges forming into a perfectly round bun.
- Once you have all the rolls formed, we can move on to arranging the wreath. Take a large square shaped baking sheet and place a layer of parchment paper. Give it a quick spray. Place a small glass in the center and add a little bit of water to the glass. This step has two purposes; 1. to give the center of the wreath some boundaries and to help keep the oven moist while you bake the bread, this will yield super soft and moist rolls. Arrange the rolls (see picture) in a circle around the glass bowl, then again around the first roll. Leave a little bit of room between the rolls to allow it to rise a bit more.
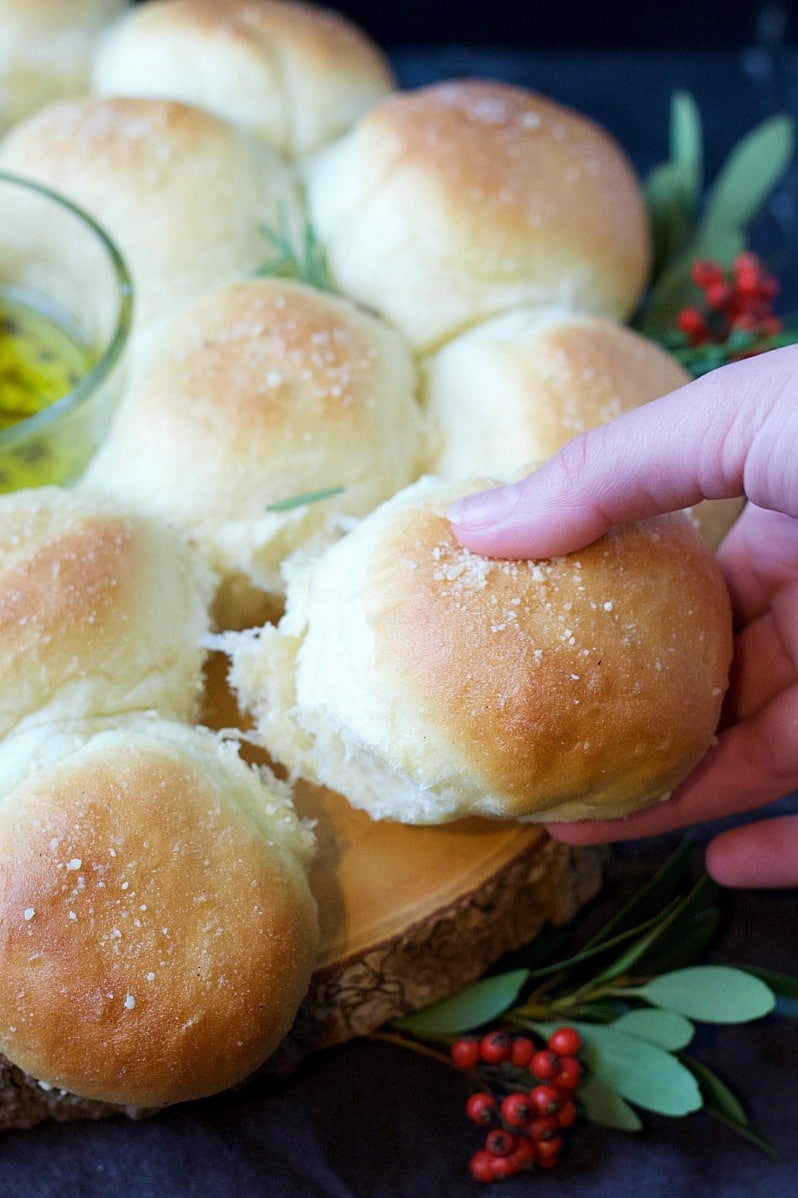
- Let the rolls rest and rise while you pre-heat the oven to 350F degrees.
- Bake for 15-18 minutes on the top rack, away from the heat so it cooks evenly and doesn’t burn the bottom. Once the tops start to turn light brown, remove from oven and place entire baking sheet on a cooling rack.
- Melt butter and brush the top of the buns, also sprinkle with parmesan cheese.
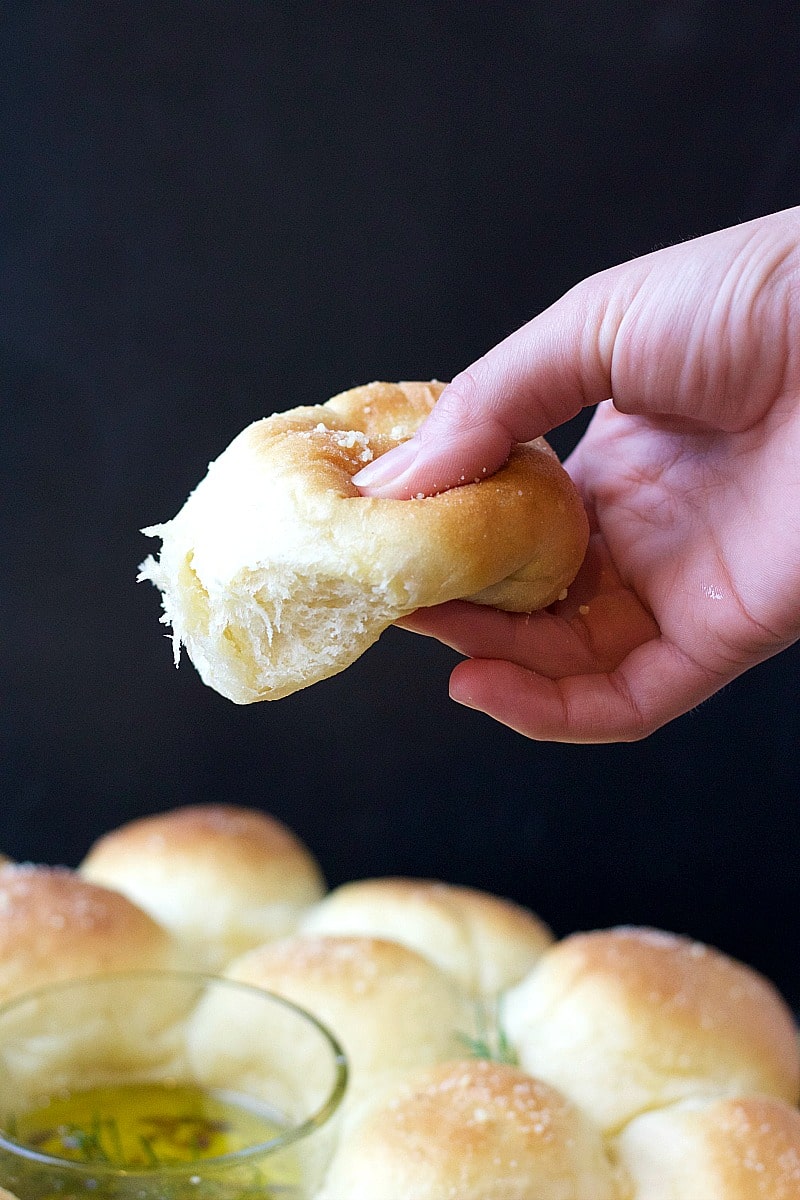
- While the buns cool off, mix the oil, garlic, parmesan and red pepper flakes in a small bowl for dipping. Add fresh rosemary if desired.
- Slide the bread wreath onto a serving platter. Place dipping oil in center. Garnish with fresh rosemary and more parmesan cheese if desired and serve.
Nutrition
Nutrition information is automatically calculated, so should only be used as an approximation.


Swoon. These look BEYOND perfect- so soft and fun and festive. Definitely need to try!
Oh they are super soft Karly, you will love it and yep they look super nice on the table too! 🙂
I can only hope to make these and make them look as good as yours do!! Gorgeous photos!
Oh you will Lisa, no big secret just make them nice and round and arrange according to picture, the yeast will do it’s magic and make them just perfect! 🙂
I LOVE a good soft dinner roll. And I love how beautifully these are arranged – so easy, but so stunning!
Oh me too, it’s irresistible! Thanks so much Melissa, hope you will try this recipe for the Holidays 🙂
Can they be frozen after baking and will they be as soft after being frozen?
Hi Linda, I haven’t tried freezing this recipe. Fresh breads usually doesn’t last more than a day at my house, lol… but I believe they will do just fine frozen, although I think all breads loose a bit of the freshness when frozen. Sorry I can’t help much with this.
Nice bread
Thanks!
Beautiful! I am excited to try recipe using bread machine at high altitude (basic changes-weigh flour, use appropriate yeast, and add an extra rise for gluten development)
Sounds good Wendy, please let me know how it comes out for you. xoxo